> ## Documentation Index
> Fetch the complete documentation index at: https://filecheck.io/docs/llms.txt
> Use this file to discover all available pages before exploring further.
# 3D Scenes
> Build the product a 3D Proof shows the artwork on: a 3D model, a folded leaflet, a booklet or a flat sheet.
A **3D Scene** is the product a [3D Proof](/docs/concepts/3d-proofs) shows the customer's artwork on. Scenes live in **Library → 3D Scenes**, and a Workflow uses one on its Soft-proofing step.
 ## Start from a Store scene
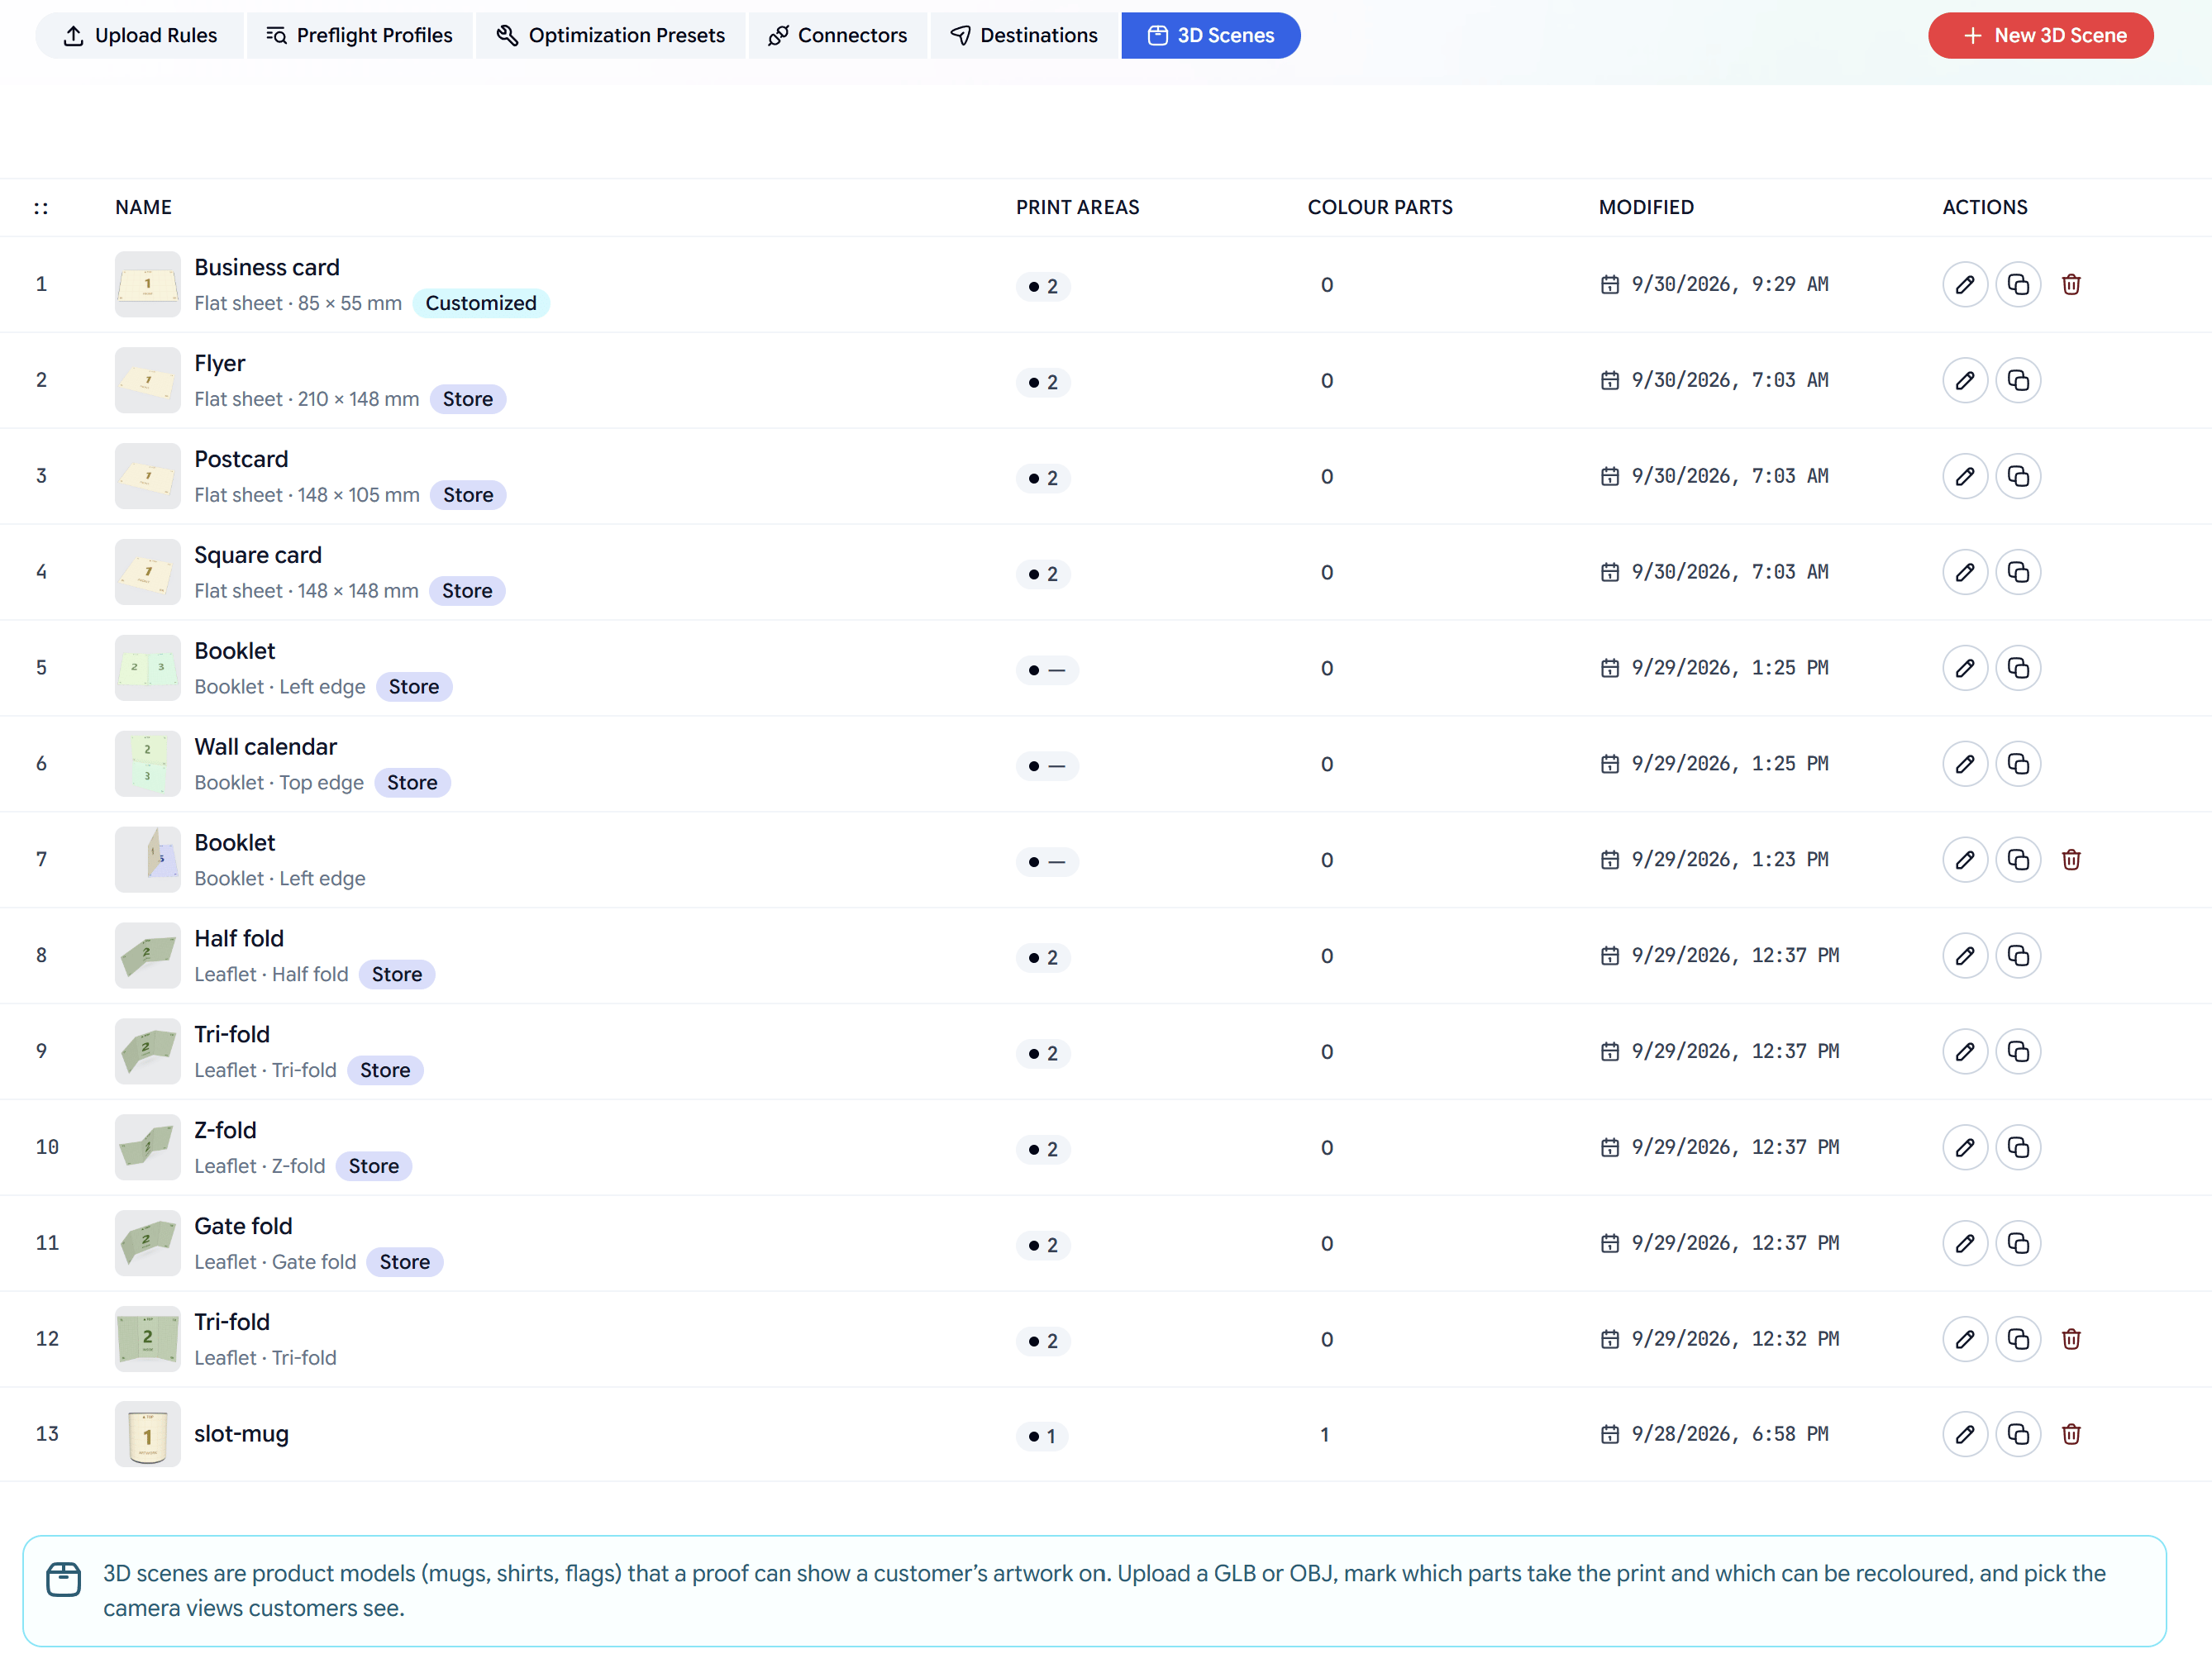
The library comes with ready-made scenes marked **Store**:
| Kind | Store scenes |
| - | - |
| **Folded leaflet** | Half fold, Tri-fold, Z-fold, Gate fold |
| **Booklet** | Booklet, Wall calendar |
| **Flat sheet** | Flyer, Postcard, Business card, Square card |
Use them as they are, or open one and change it. Saving an edited Store scene gives you your own copy, marked **Customized**, and your workflows use it from then on.
A 3D product always starts from your own model.
## Create a scene
Go to **Library → 3D Scenes** and click **New 3D Scene**.
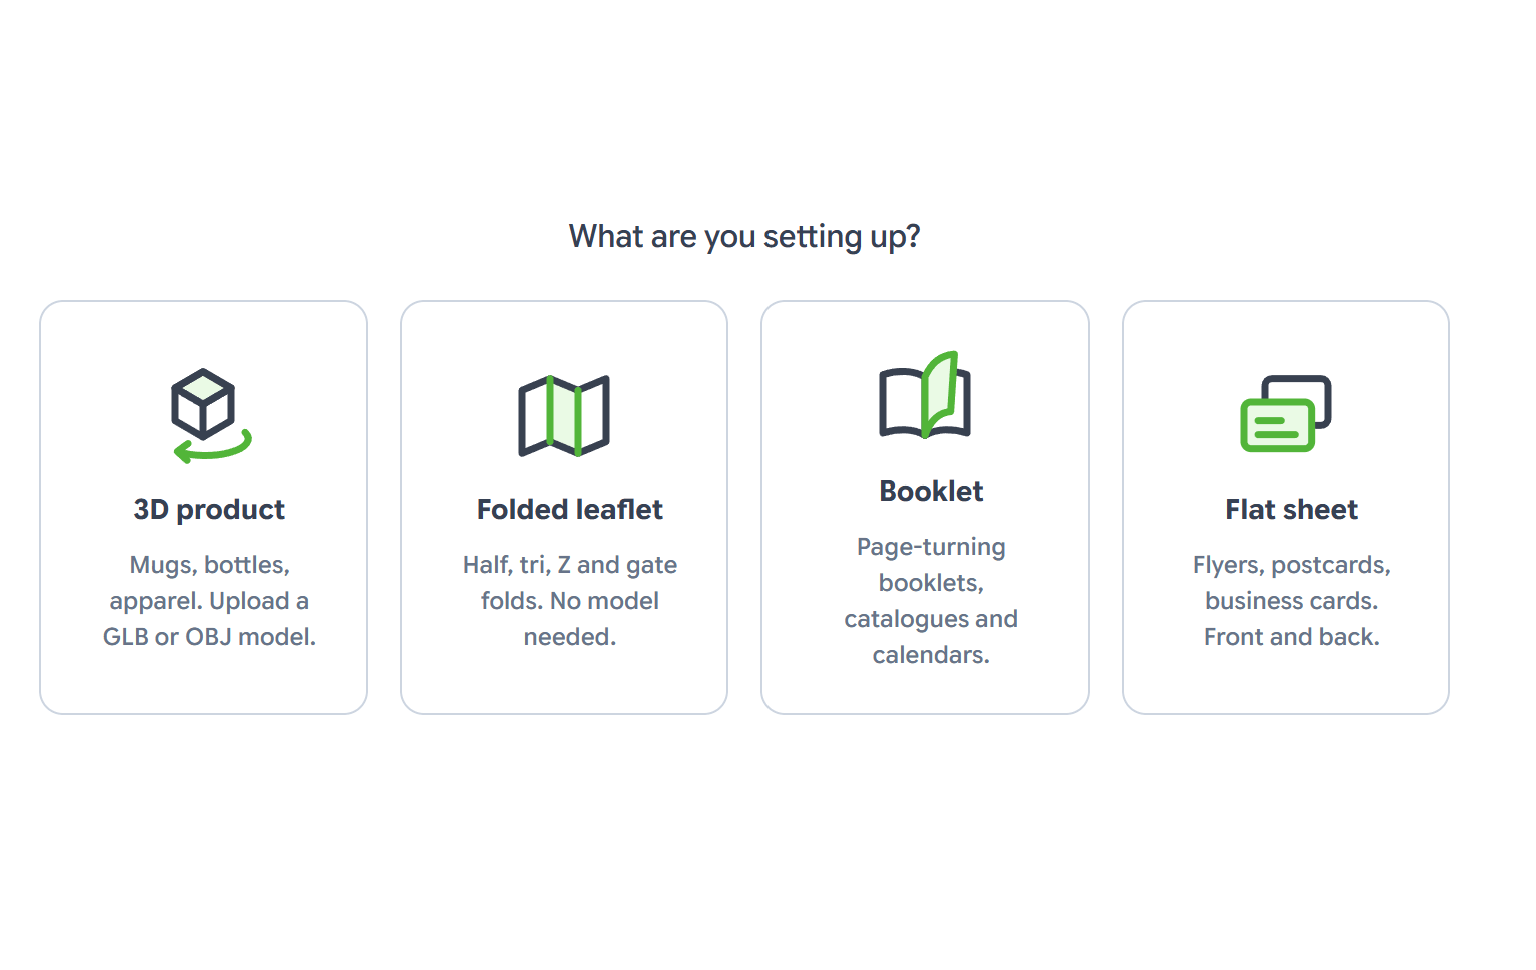
Pick **3D product**, **Folded leaflet**, **Booklet** or **Flat sheet**, and give the scene a **Title**.
## Start from a Store scene
The library comes with ready-made scenes marked **Store**:
| Kind | Store scenes |
| - | - |
| **Folded leaflet** | Half fold, Tri-fold, Z-fold, Gate fold |
| **Booklet** | Booklet, Wall calendar |
| **Flat sheet** | Flyer, Postcard, Business card, Square card |
Use them as they are, or open one and change it. Saving an edited Store scene gives you your own copy, marked **Customized**, and your workflows use it from then on.
A 3D product always starts from your own model.
## Create a scene
Go to **Library → 3D Scenes** and click **New 3D Scene**.
Pick **3D product**, **Folded leaflet**, **Booklet** or **Flat sheet**, and give the scene a **Title**.
 Fill in the cards on the right. They depend on the kind, as described below. The preview on the left updates as you go.
The preview starts with a numbered test pattern, so you can see which page lands where and which way is up. Use the buttons under the preview to try real artwork, and **Test pattern** to go back.
Click **Save**. The library thumbnail is taken from the start view.
## 3D product
Fill in the cards on the right. They depend on the kind, as described below. The preview on the left updates as you go.
The preview starts with a numbered test pattern, so you can see which page lands where and which way is up. Use the buttons under the preview to try real artwork, and **Test pattern** to go back.
Click **Save**. The library thumbnail is taken from the start view.
## 3D product
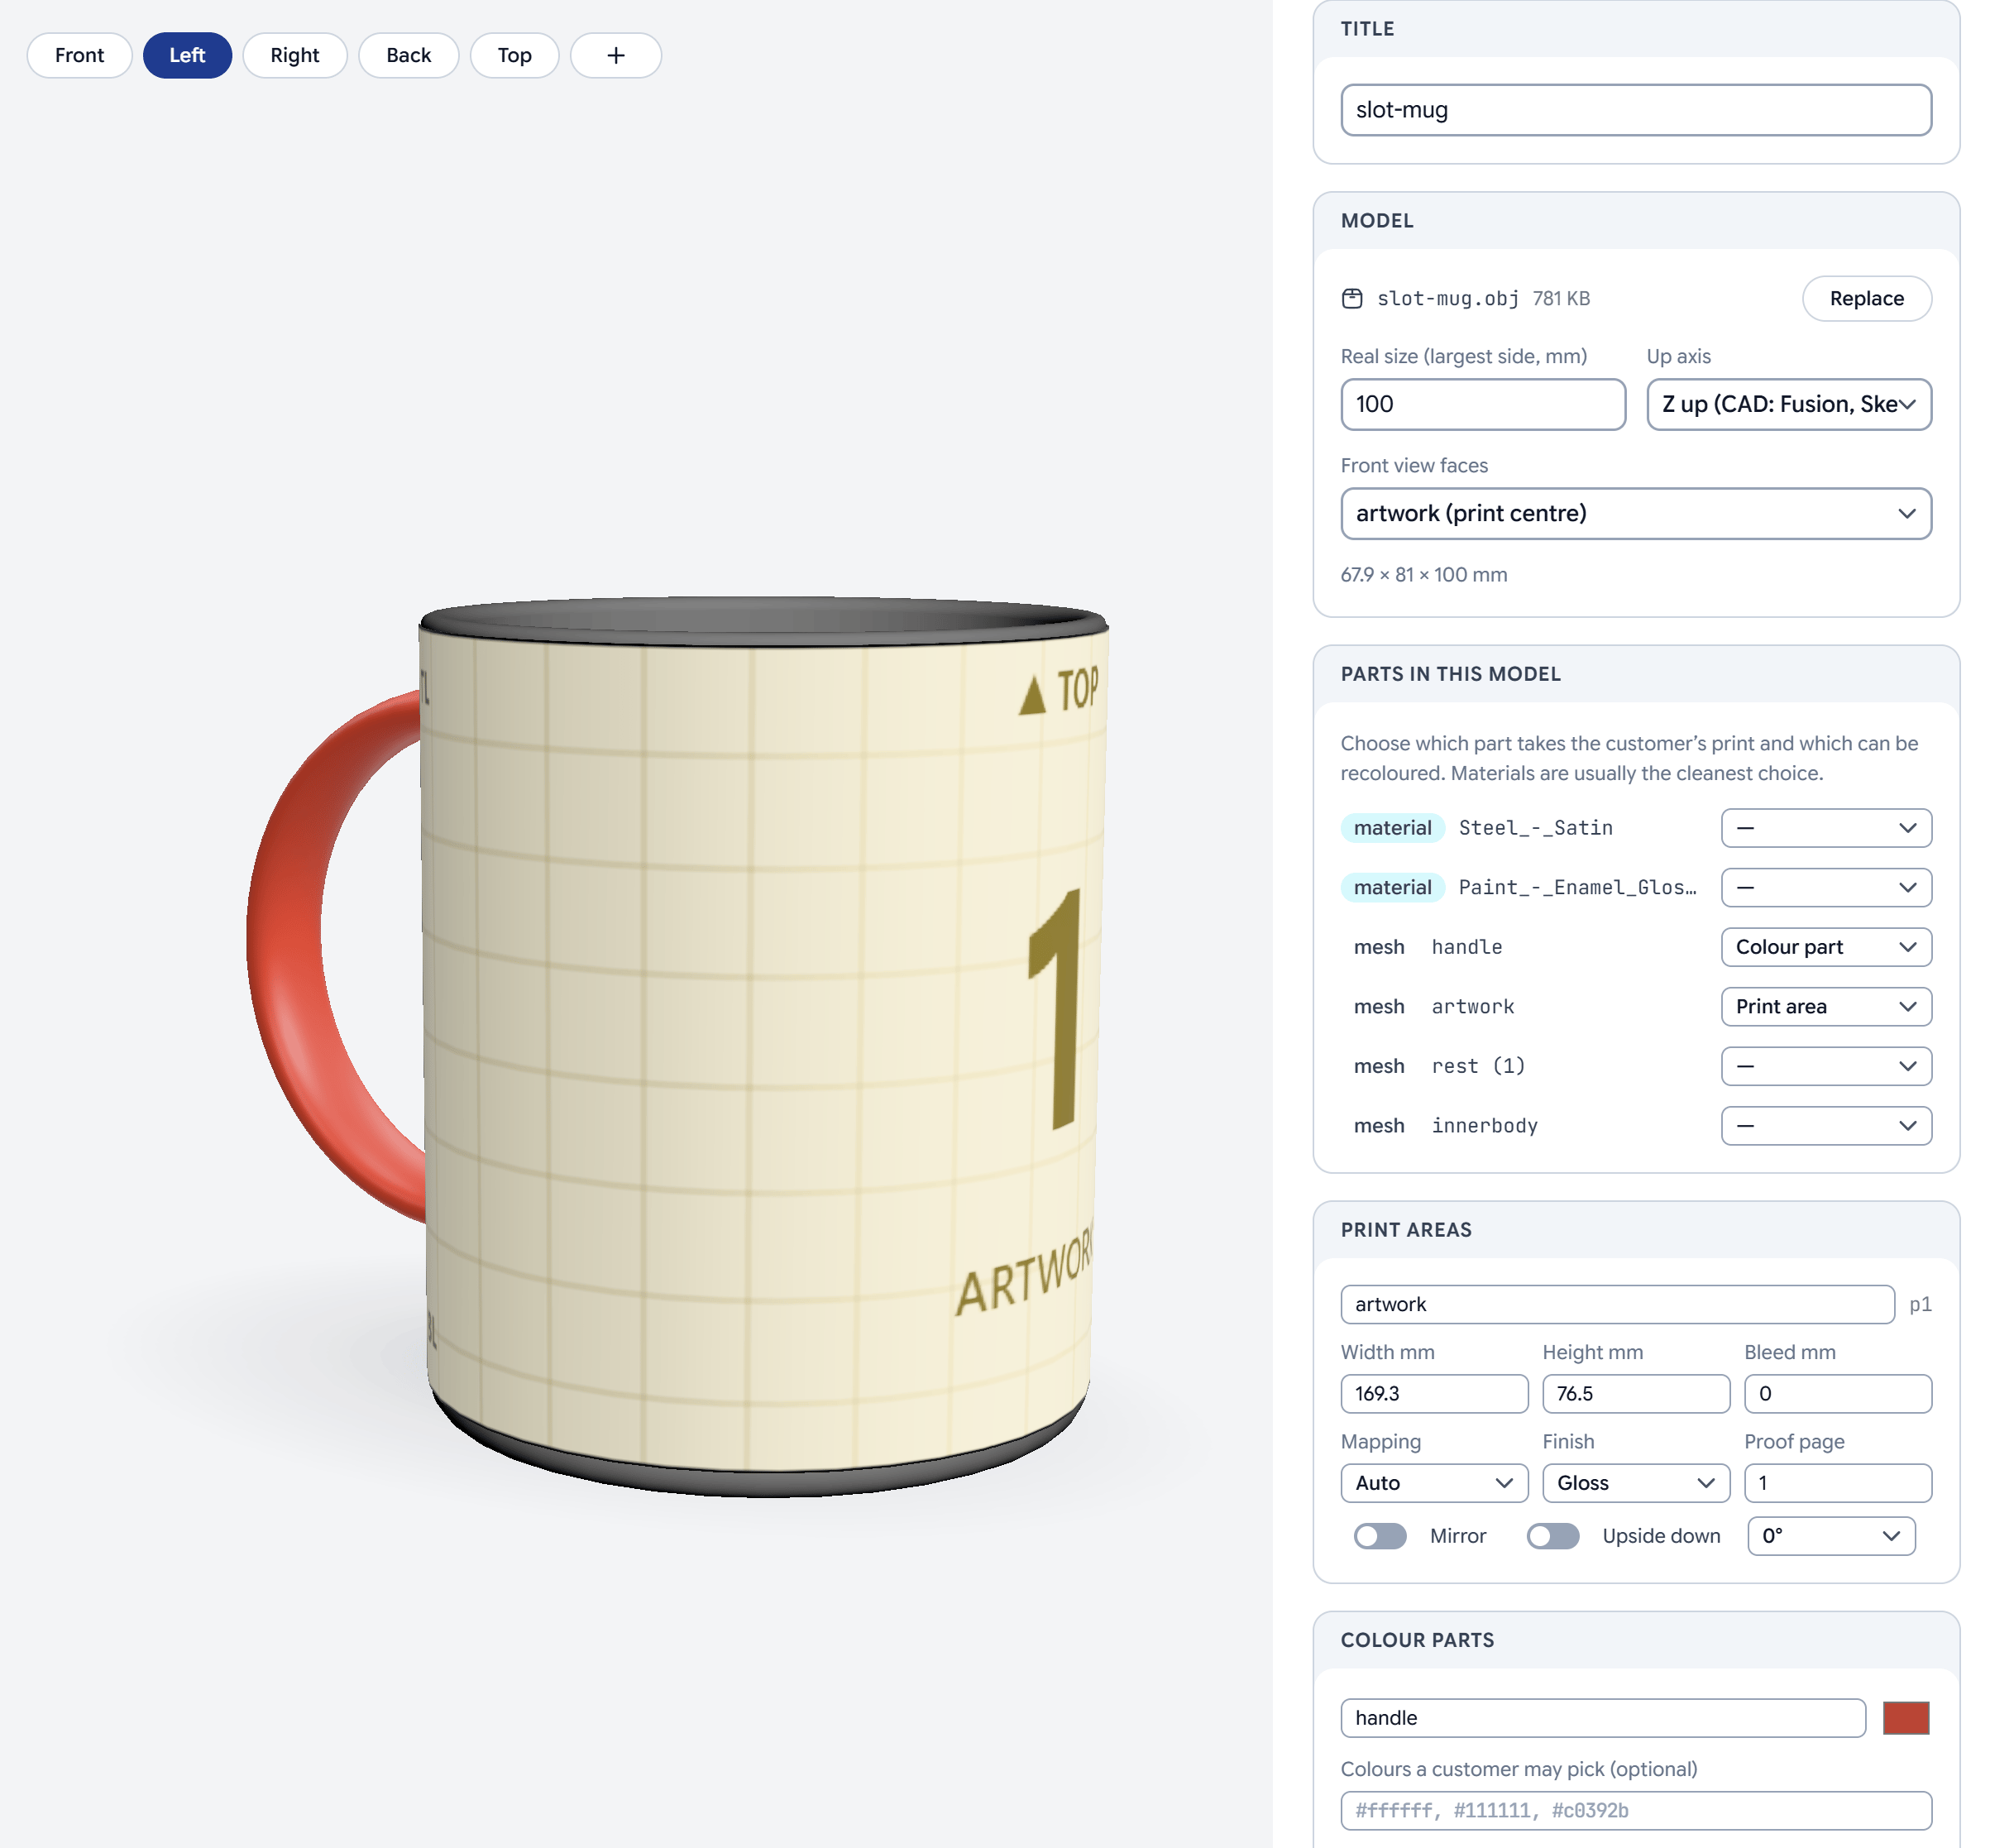 Drop a **GLB** or **OBJ** file on the preview, or choose one. GLB works best: one file with its materials. For OBJ, add its `.mtl` file too. Convert FBX files to GLB first. Models can be up to 60 MB.
In the **Model** card, set:
* **Real size (largest side, mm)**, so the print lands at its true size.
* **Up axis**: **Y up** for glTF and most tools, **Z up** for CAD tools such as Fusion or SketchUp.
* **Front view faces**: the centre of a print area, or the model's own front.
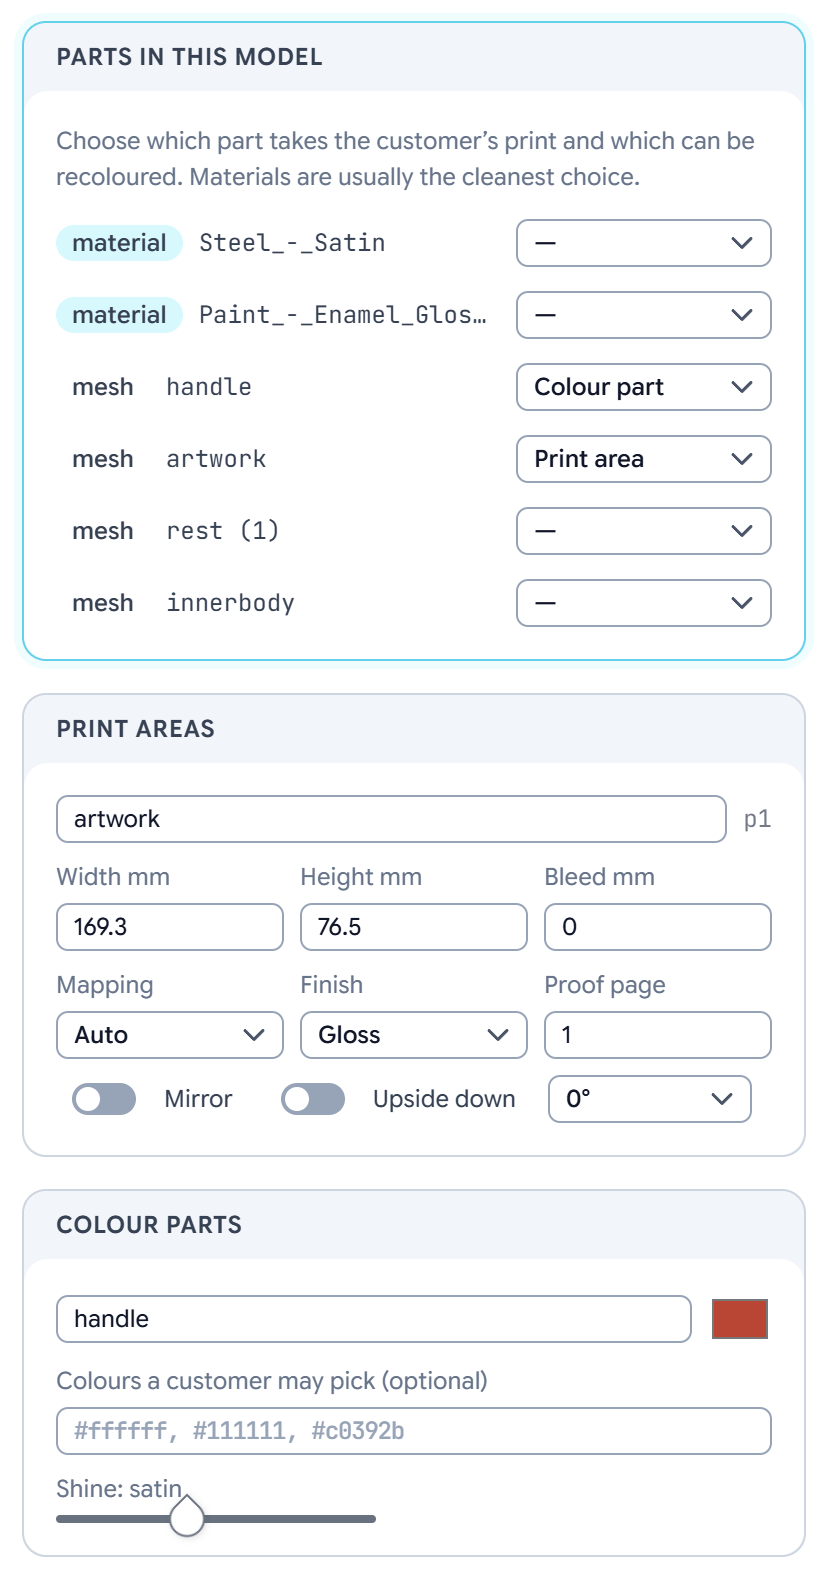
**Parts in this model** lists the model's meshes and materials. Set each one to **Print area**, **Colour part** or leave it at **—**. Materials are usually the cleanest choice.
Each print area has these settings:
* **Width mm**, **Height mm** and **Bleed mm**: the printed size. When the surface measures differently, the studio offers **Surface measures … use** to take the model's size.
* **Mapping**: how the art is laid on the surface. **Auto** picks for you; **Wrap (cylinder)** goes round mugs and bottles; **Flat** projects straight on; **Model's own UVs** keeps the model's mapping.
* **Finish**: Gloss, Silk, Matte or Uncoated.
* **Proof page**: which page of the customer's file this area shows.
* **Mirror**, **Upside down** and a rotation, for when the art comes out the wrong way.
Under **Colour parts**, give each part its colour and its **Shine**.
Drop a **GLB** or **OBJ** file on the preview, or choose one. GLB works best: one file with its materials. For OBJ, add its `.mtl` file too. Convert FBX files to GLB first. Models can be up to 60 MB.
In the **Model** card, set:
* **Real size (largest side, mm)**, so the print lands at its true size.
* **Up axis**: **Y up** for glTF and most tools, **Z up** for CAD tools such as Fusion or SketchUp.
* **Front view faces**: the centre of a print area, or the model's own front.
**Parts in this model** lists the model's meshes and materials. Set each one to **Print area**, **Colour part** or leave it at **—**. Materials are usually the cleanest choice.
Each print area has these settings:
* **Width mm**, **Height mm** and **Bleed mm**: the printed size. When the surface measures differently, the studio offers **Surface measures … use** to take the model's size.
* **Mapping**: how the art is laid on the surface. **Auto** picks for you; **Wrap (cylinder)** goes round mugs and bottles; **Flat** projects straight on; **Model's own UVs** keeps the model's mapping.
* **Finish**: Gloss, Silk, Matte or Uncoated.
* **Proof page**: which page of the customer's file this area shows.
* **Mirror**, **Upside down** and a rotation, for when the art comes out the wrong way.
Under **Colour parts**, give each part its colour and its **Shine**.
 ## Folded leaflet
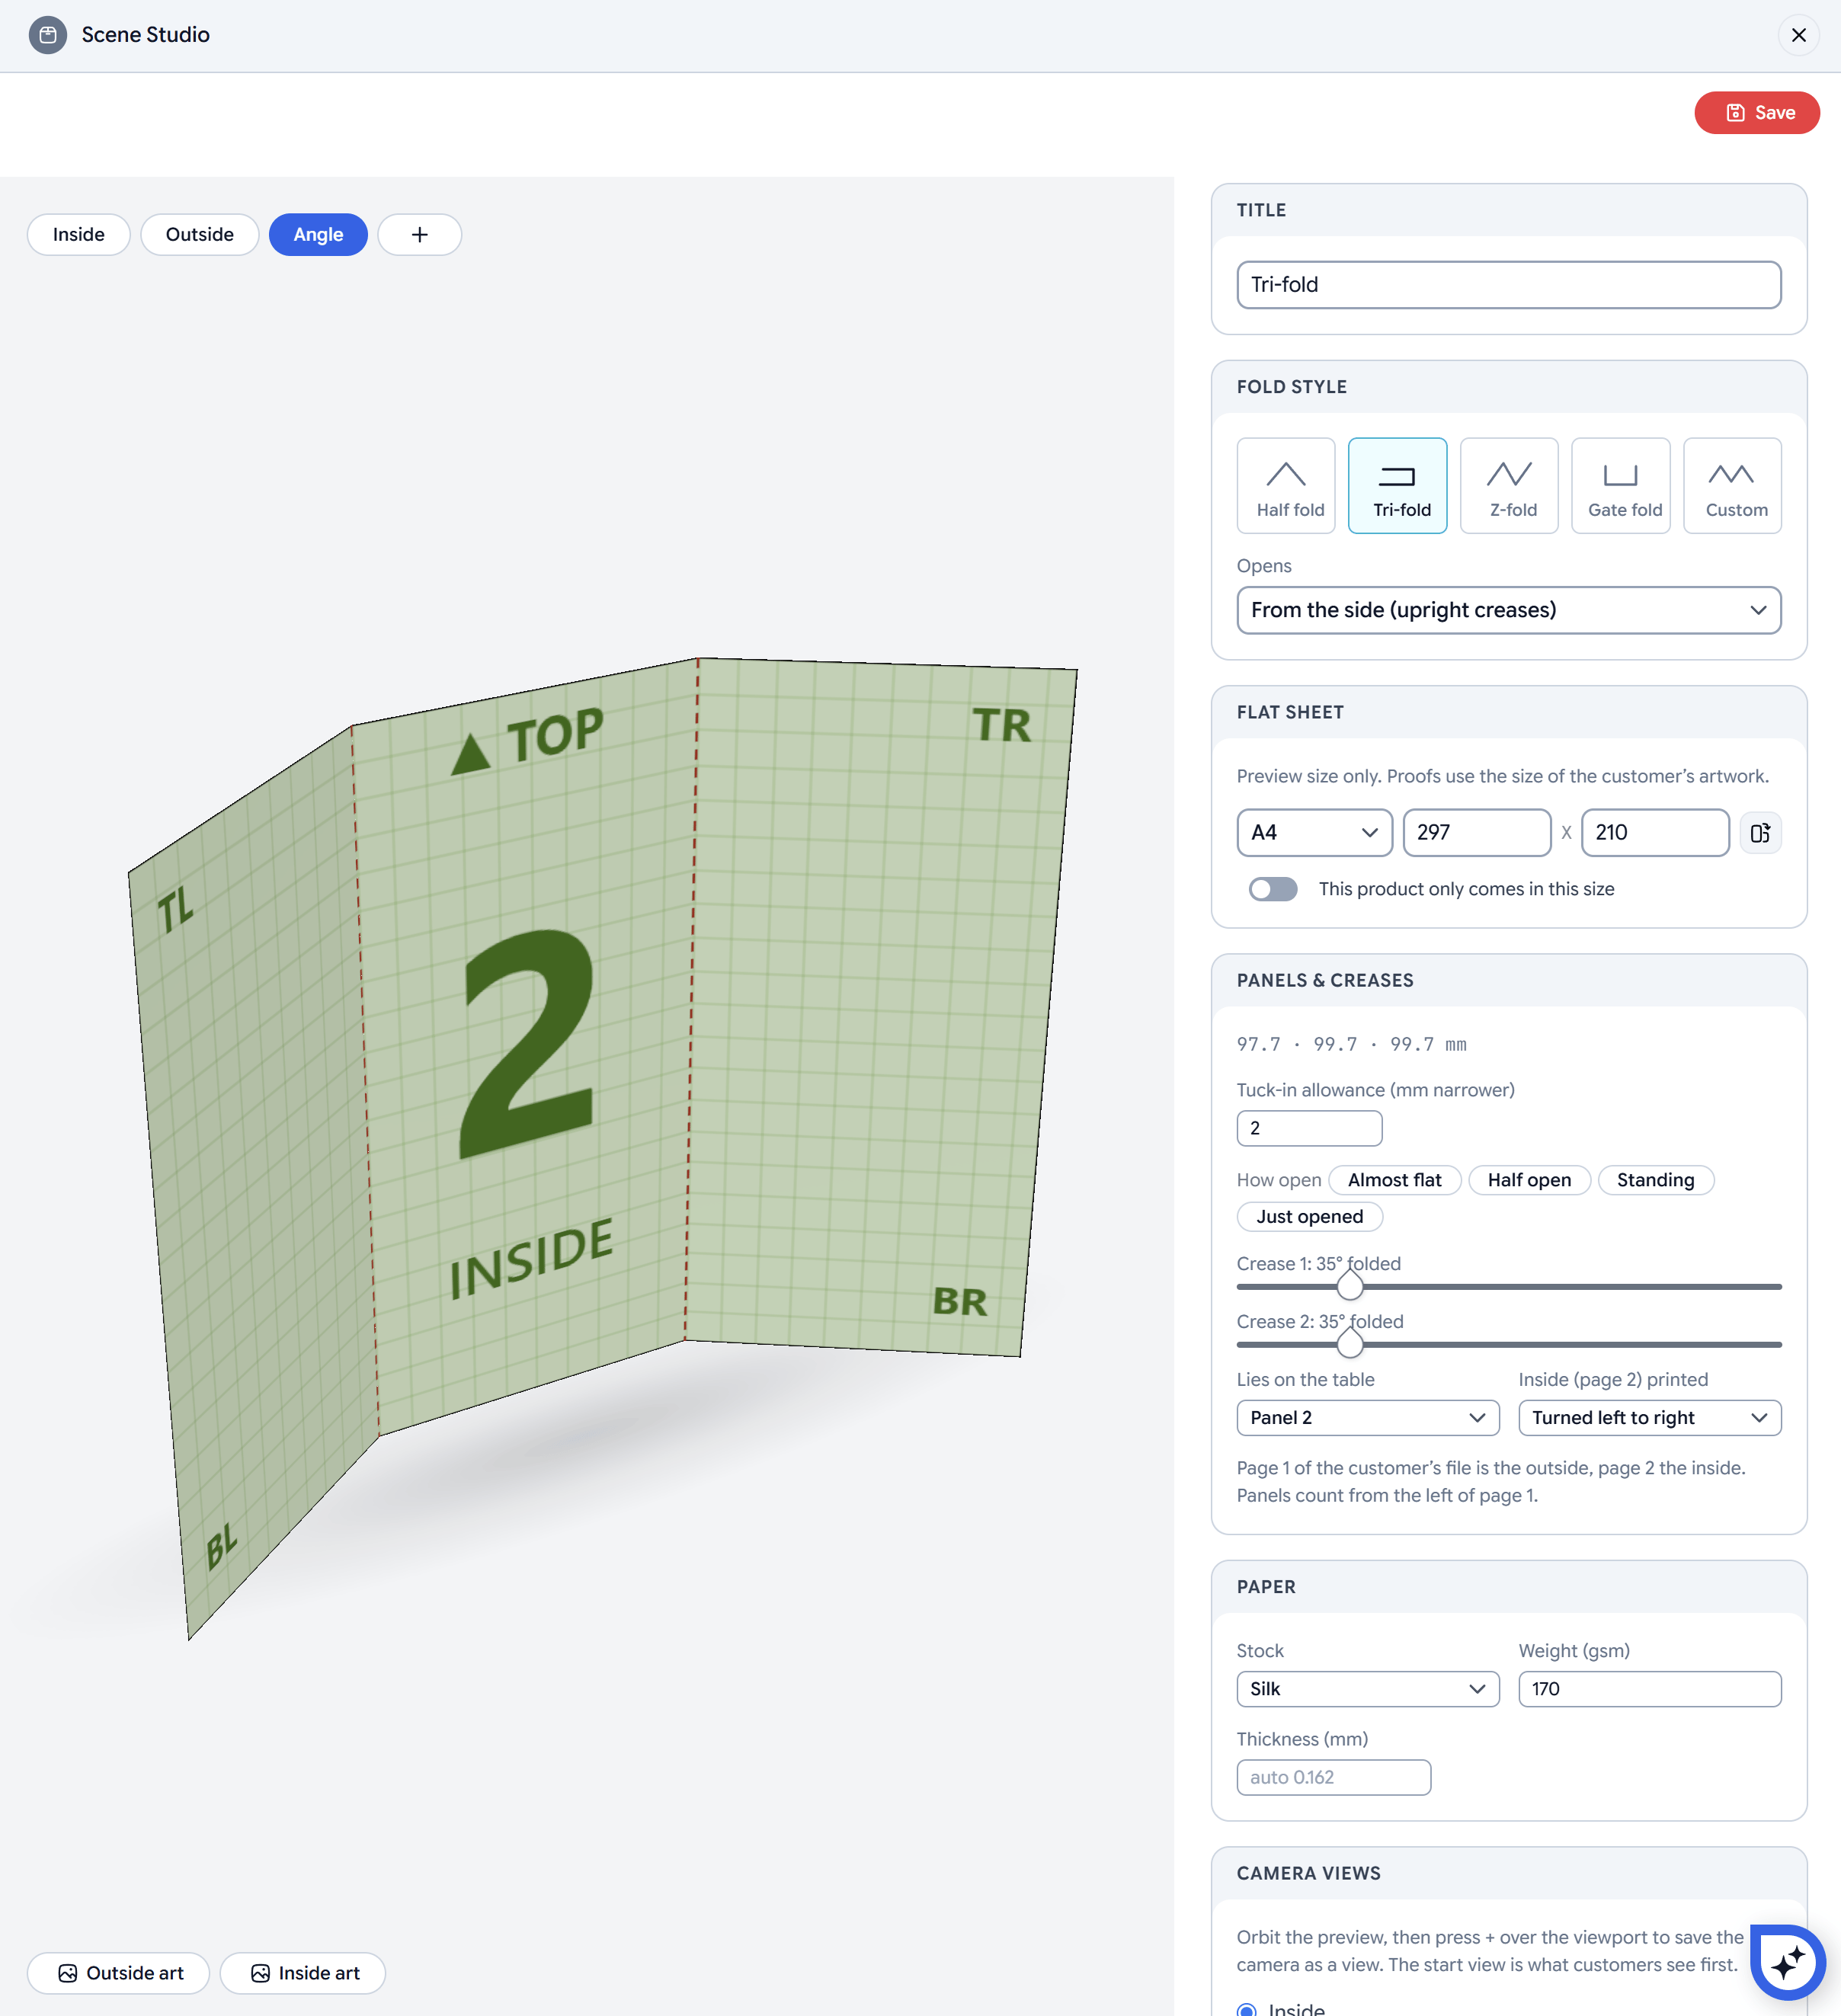 * **Fold style**: Half fold, Tri-fold, Z-fold, Gate fold or Custom. **Opens** sets whether it opens from the side (upright creases) or from the top (level creases).
* **Flat sheet**: the unfolded size, from a list (A4, A3, A5, US Letter, US Legal, Tabloid) or typed in. It is for the preview only: proofs use the size of the customer's artwork, unless you turn on **This product only comes in this size**.
* **Panels & creases**:
* **Custom** lets you set each panel's width.
* Tri-folds and gate folds have a **Tuck-in allowance**, the amount the inner panels are narrower so they fold inside.
* **How open** sets every crease at once (**Almost flat**, **Half open**, **Standing**, **Just opened**), and a slider per crease fine-tunes it.
* **Lies on the table** picks the panel that stays still.
* **Inside (page 2) printed** sets whether the inside is **Turned left to right** or **Tumbled top to bottom**.
* **Paper**: see [Paper](#paper). The leaflet's Paper card also has [Edges](#painted-edges).
Page 1 of the customer's file is the outside and page 2 the inside, unless you [supply a side](#sides-and-covers-you-supply). Panels count from the left of page 1, or from the top when the leaflet opens from the top.
## Booklet
* **Fold style**: Half fold, Tri-fold, Z-fold, Gate fold or Custom. **Opens** sets whether it opens from the side (upright creases) or from the top (level creases).
* **Flat sheet**: the unfolded size, from a list (A4, A3, A5, US Letter, US Legal, Tabloid) or typed in. It is for the preview only: proofs use the size of the customer's artwork, unless you turn on **This product only comes in this size**.
* **Panels & creases**:
* **Custom** lets you set each panel's width.
* Tri-folds and gate folds have a **Tuck-in allowance**, the amount the inner panels are narrower so they fold inside.
* **How open** sets every crease at once (**Almost flat**, **Half open**, **Standing**, **Just opened**), and a slider per crease fine-tunes it.
* **Lies on the table** picks the panel that stays still.
* **Inside (page 2) printed** sets whether the inside is **Turned left to right** or **Tumbled top to bottom**.
* **Paper**: see [Paper](#paper). The leaflet's Paper card also has [Edges](#painted-edges).
Page 1 of the customer's file is the outside and page 2 the inside, unless you [supply a side](#sides-and-covers-you-supply). Panels count from the left of page 1, or from the top when the leaflet opens from the top.
## Booklet
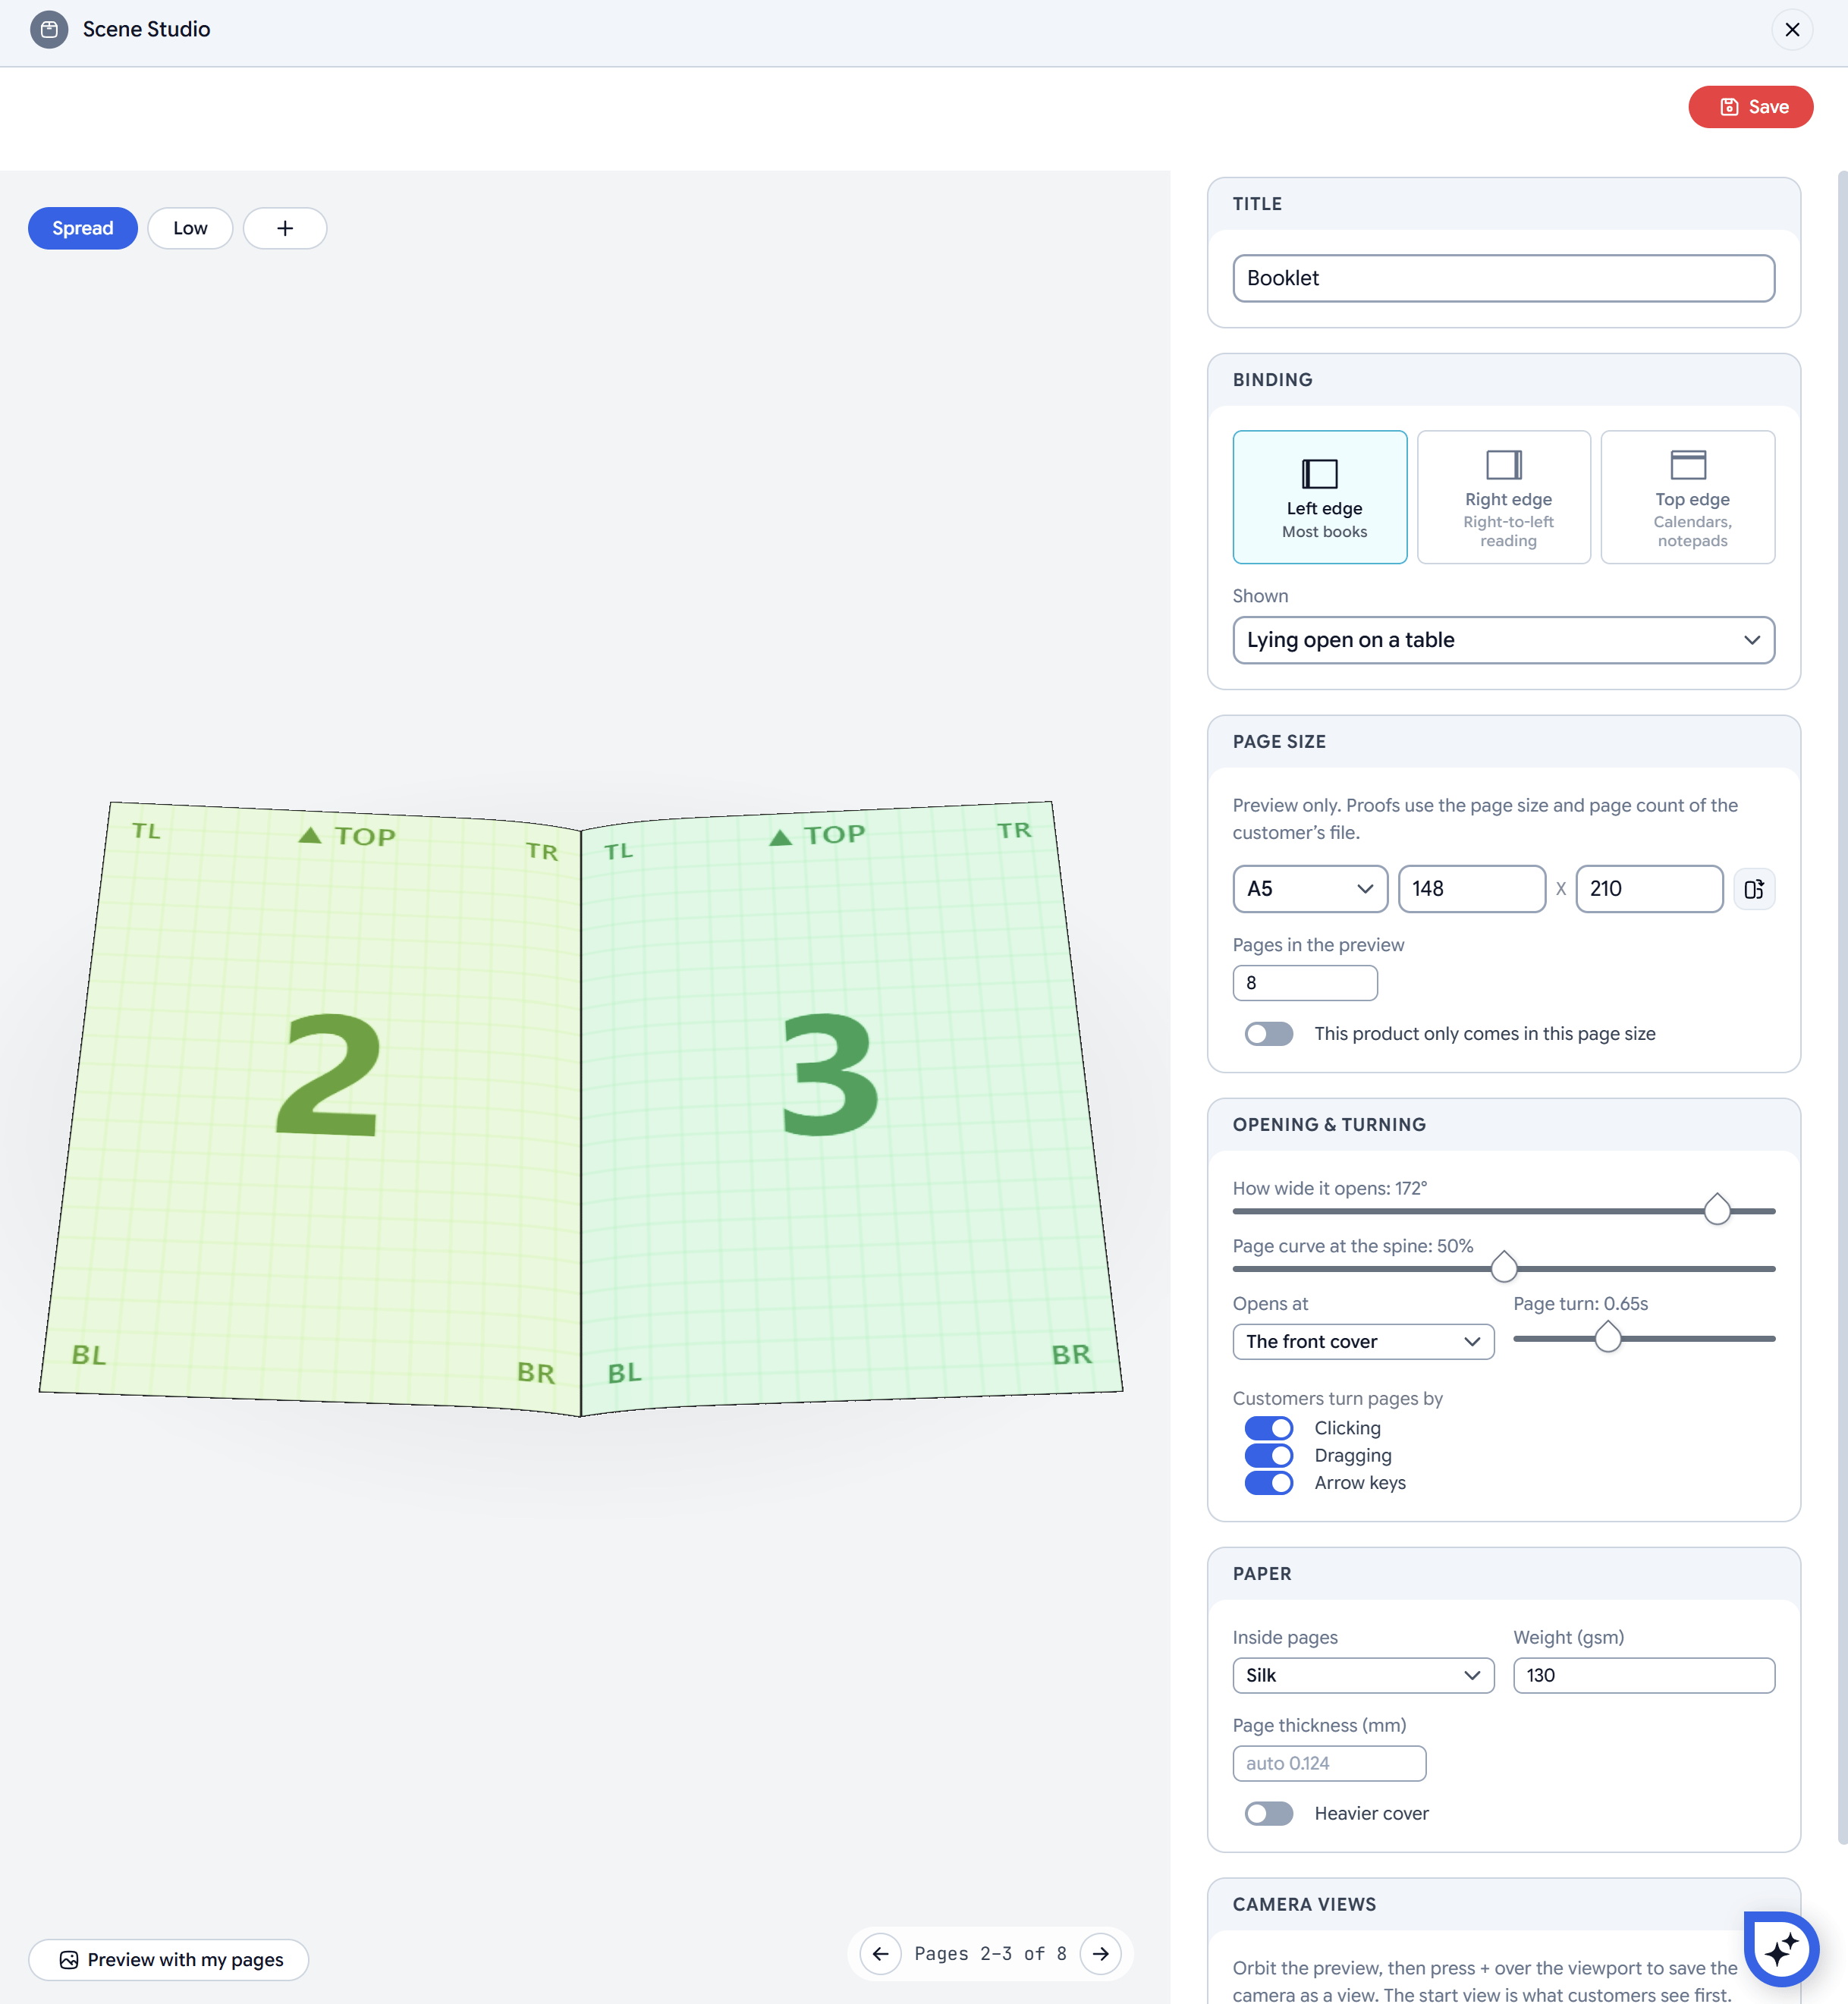 * **Binding**: **Left edge** for most books, **Right edge** for right-to-left reading, or **Top edge** for calendars and notepads. **Shown** sets whether it lies open on a table or stands up.
* **Page size**: one page's size, from a list (A4, A5, A6, US Letter, Half Letter, Square 210) or typed in, and **Pages in the preview**. Both are for the preview only: proofs use the page size and page count of the customer's file. **This product only comes in this page size** fixes the size; the page count still comes from the file.
* **Opening & turning**:
* **How wide it opens**, and the **Page curve at the spine**.
* **Opens at**: the front cover or the first spread.
* The **Page turn** speed.
* **Customers turn pages by** clicking, dragging or the arrow keys. Turn each one on or off.
* **Paper**: the inside pages' stock, weight and **Page thickness**. Turn on **Heavier cover** to give the cover its own stock and weight.
## Flat sheet
* **Binding**: **Left edge** for most books, **Right edge** for right-to-left reading, or **Top edge** for calendars and notepads. **Shown** sets whether it lies open on a table or stands up.
* **Page size**: one page's size, from a list (A4, A5, A6, US Letter, Half Letter, Square 210) or typed in, and **Pages in the preview**. Both are for the preview only: proofs use the page size and page count of the customer's file. **This product only comes in this page size** fixes the size; the page count still comes from the file.
* **Opening & turning**:
* **How wide it opens**, and the **Page curve at the spine**.
* **Opens at**: the front cover or the first spread.
* The **Page turn** speed.
* **Customers turn pages by** clicking, dragging or the arrow keys. Turn each one on or off.
* **Paper**: the inside pages' stock, weight and **Page thickness**. Turn on **Heavier cover** to give the cover its own stock and weight.
## Flat sheet
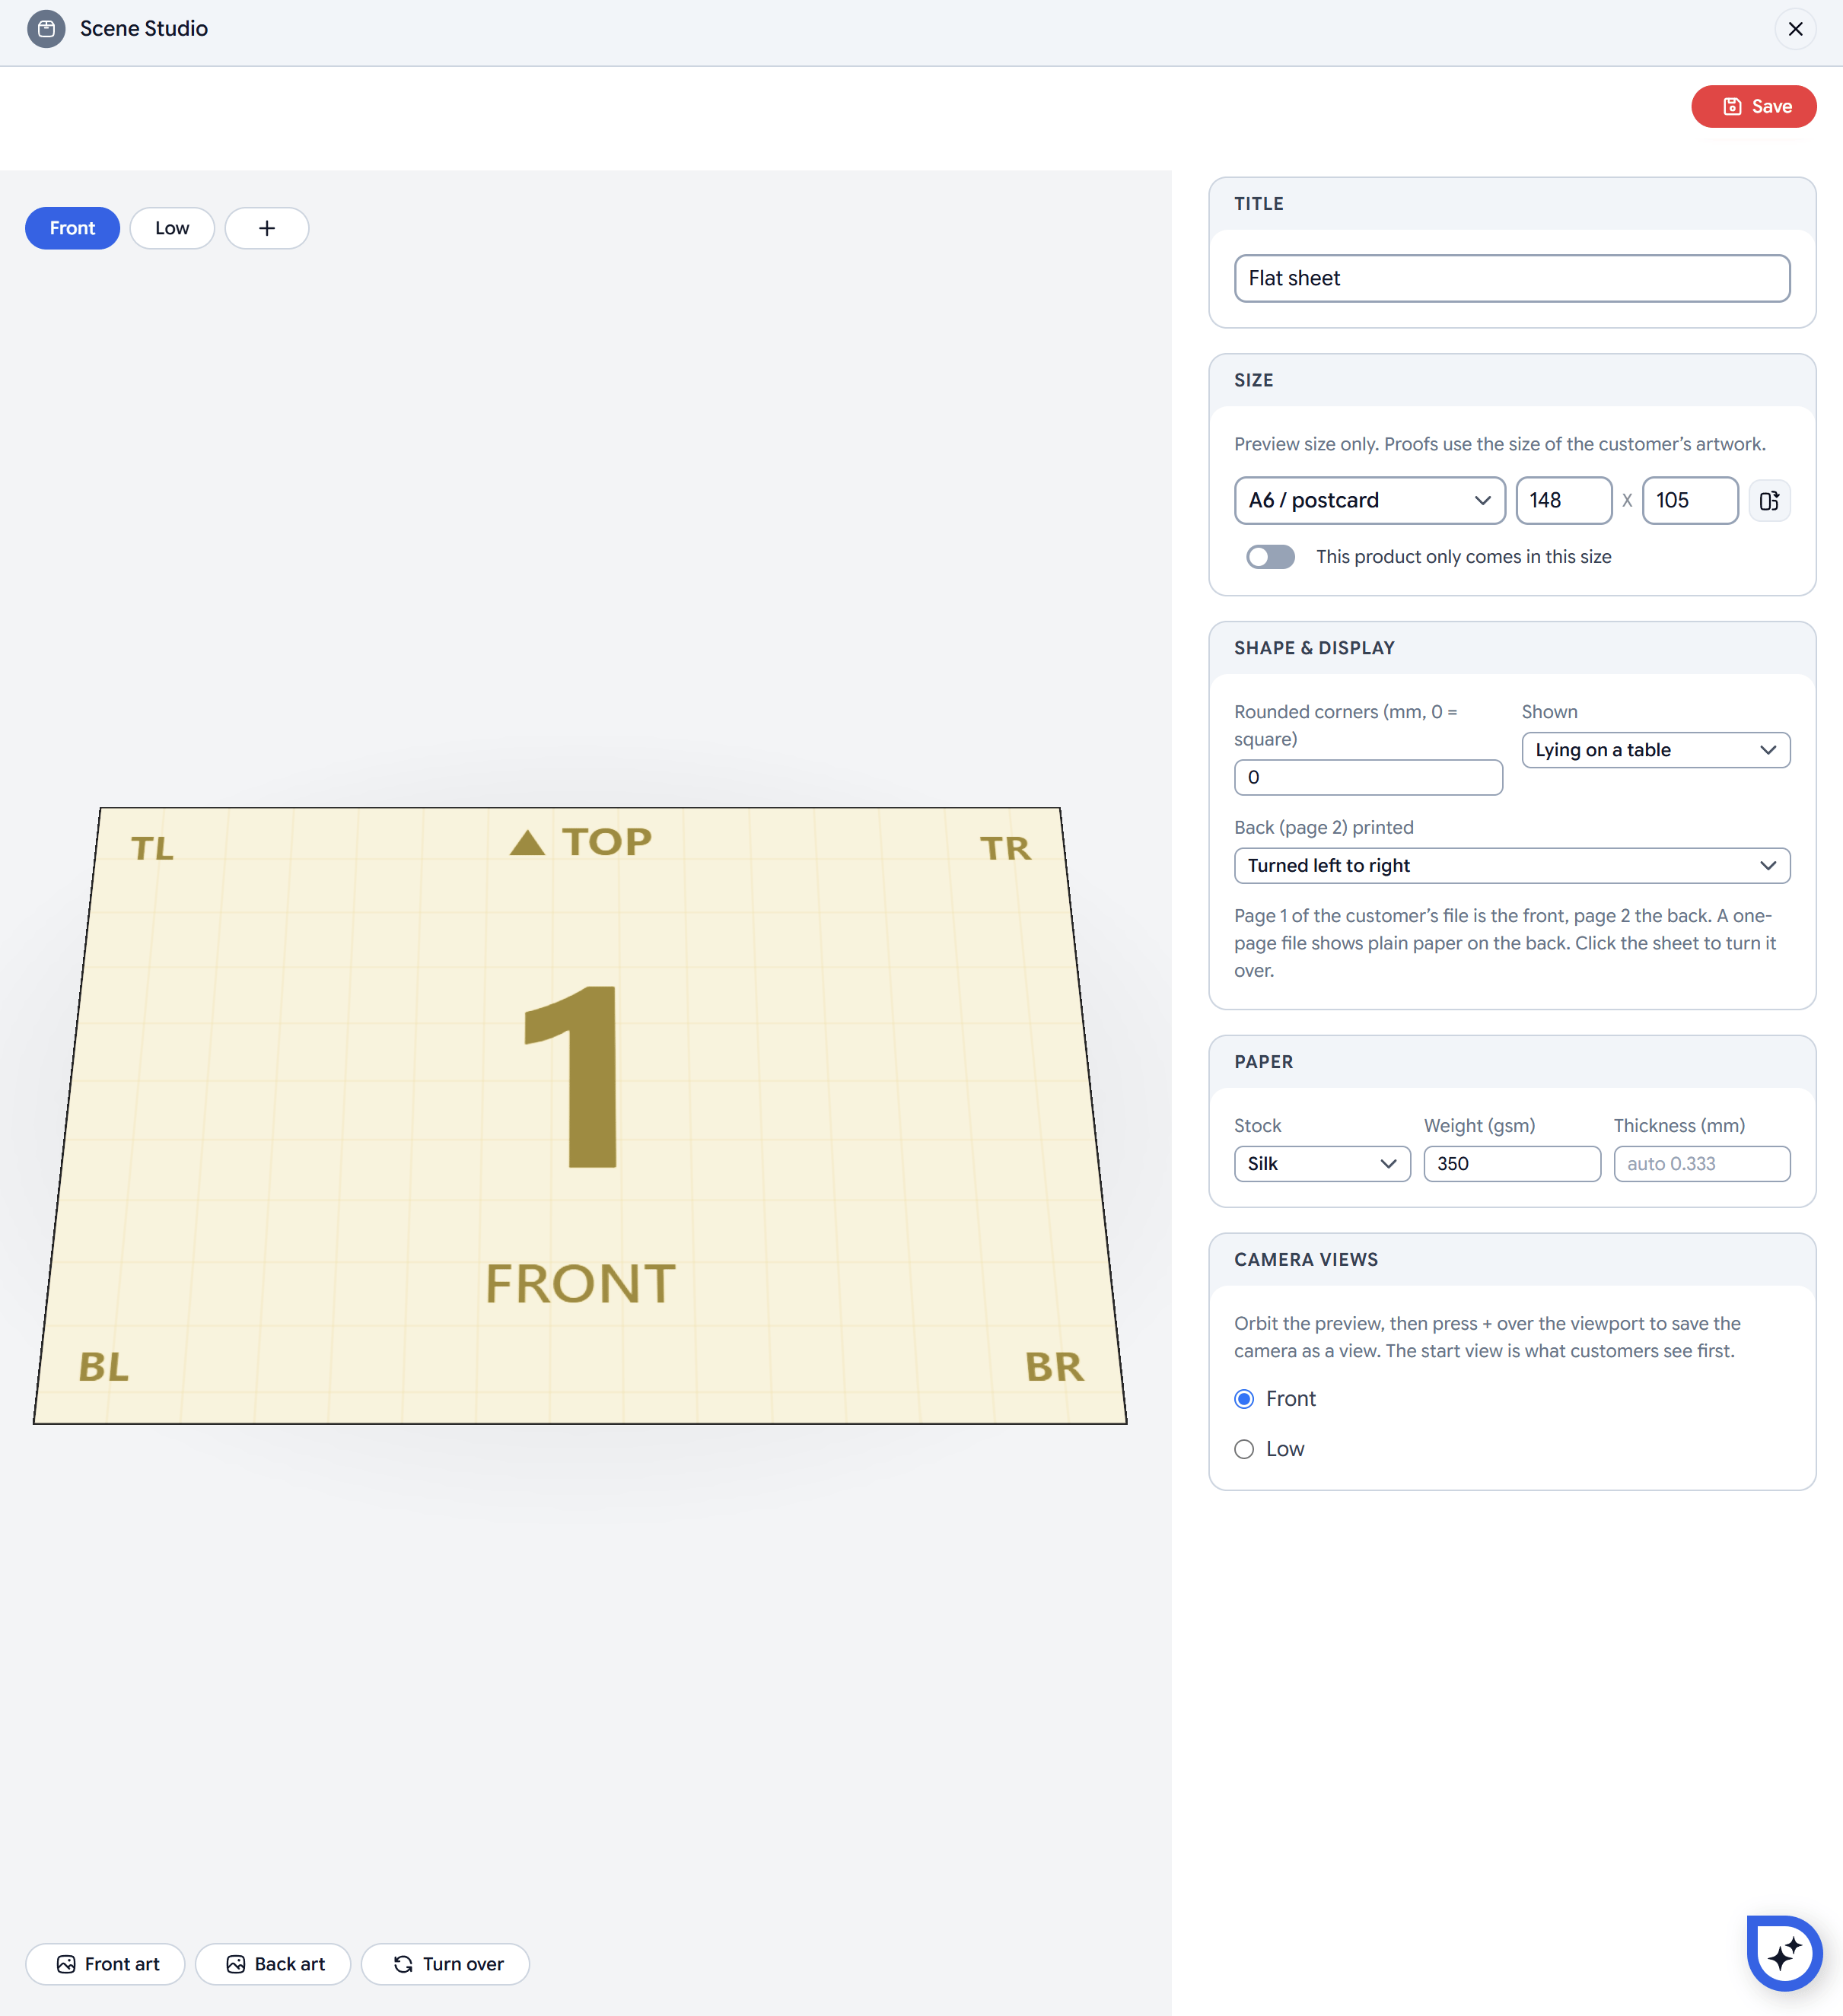 * **Size**: from a list (business cards, A6 and 6 × 4 in postcards, DL, A5, A4, US Letter, Square 148) or typed in. It is for the preview only, unless you turn on **This product only comes in this size**.
* **Shape & display**:
* **Rounded corners** in mm, with 0 for square corners.
* **Shown**: lying on a table or standing up.
* **Back (page 2) printed**: turned left to right or tumbled top to bottom.
* **Edges**: see [Painted edges](#painted-edges).
* **Paper**: see [Paper](#paper).
Page 1 of the customer's file is the front and page 2 the back, unless you [supply a side](#sides-and-covers-you-supply). A one-page file shows plain paper on the back. Customers click the sheet to turn it over.
## Sides and covers you supply
Some products have a side the customer doesn't design: a single-sided business card with a green back, a leaflet with a printed order form inside, or a booklet whose back cover is always the same. Set those sides in the **Sides you supply** card (**Covers you supply** for booklets), and the customer only uploads the rest.
Each side is one of:
* **Customer's file**: the default. The side shows a page of the customer's file.
* **A colour**: the whole side in one colour.
* **An image**: a PNG, JPEG or WebP up to 4 MB. **Fills the side** covers it edge to edge, cropping what doesn't fit. **Fits on a colour** shows the whole image on a background colour you choose.
The customer's pages fill the sides you don't supply, in order:
| Product | You supply | The customer's page 1 goes on |
| - | - | - |
| **Flat sheet** | The back | The front |
| **Flat sheet** | The front | The back |
| **Folded leaflet** | The outside | The inside |
| **Folded leaflet** | The inside | The outside |
A flat sheet or leaflet always keeps one side for the customer's file, so once one side is supplied the studio won't let you supply the other.
### Booklet covers
* **Size**: from a list (business cards, A6 and 6 × 4 in postcards, DL, A5, A4, US Letter, Square 148) or typed in. It is for the preview only, unless you turn on **This product only comes in this size**.
* **Shape & display**:
* **Rounded corners** in mm, with 0 for square corners.
* **Shown**: lying on a table or standing up.
* **Back (page 2) printed**: turned left to right or tumbled top to bottom.
* **Edges**: see [Painted edges](#painted-edges).
* **Paper**: see [Paper](#paper).
Page 1 of the customer's file is the front and page 2 the back, unless you [supply a side](#sides-and-covers-you-supply). A one-page file shows plain paper on the back. Customers click the sheet to turn it over.
## Sides and covers you supply
Some products have a side the customer doesn't design: a single-sided business card with a green back, a leaflet with a printed order form inside, or a booklet whose back cover is always the same. Set those sides in the **Sides you supply** card (**Covers you supply** for booklets), and the customer only uploads the rest.
Each side is one of:
* **Customer's file**: the default. The side shows a page of the customer's file.
* **A colour**: the whole side in one colour.
* **An image**: a PNG, JPEG or WebP up to 4 MB. **Fills the side** covers it edge to edge, cropping what doesn't fit. **Fits on a colour** shows the whole image on a background colour you choose.
The customer's pages fill the sides you don't supply, in order:
| Product | You supply | The customer's page 1 goes on |
| - | - | - |
| **Flat sheet** | The back | The front |
| **Flat sheet** | The front | The back |
| **Folded leaflet** | The outside | The inside |
| **Folded leaflet** | The inside | The outside |
A flat sheet or leaflet always keeps one side for the customer's file, so once one side is supplied the studio won't let you supply the other.
### Booklet covers
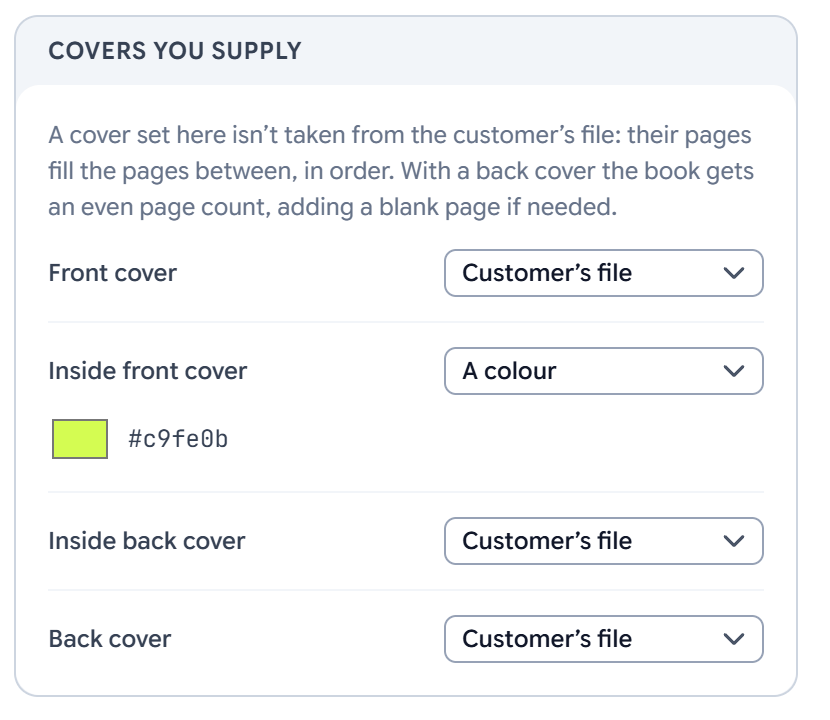 A booklet can supply any of its four covers: the **front cover**, the **inside front cover**, the **inside back cover** and the **back cover**. They stay in their places, and the customer's pages fill the pages between them in order. For example, with a supplied front and back cover, a 6-page file becomes an 8-page booklet: your front cover, the customer's pages 1 to 6, then your back cover.
A back cover (or an inside back cover) always lands on the back of the last sheet. When the page count would be odd, a blank page is added before it.
Sides you supply appear in the 3D Proof only. The flat **Pages** view and the print file are the customer's pages as uploaded.
## Paper
Leaflets, booklets and sheets have a **Paper** card:
* **Stock**: Uncoated, Matte, Silk or Gloss. It sets how much the paper shines.
* **Weight (gsm)**.
* **Thickness (mm)**: leave it empty to work it out from the weight, or type the caliper of your stock.
## Painted edges
Flat sheets and folded leaflets can show painted edges, like edge-painted business cards. Set **Edges** to **Painted (a colour)** and pick the colour, or leave it on **Paper**. On a flat sheet the whole edge is painted, rounded corners included. On a leaflet only the outer edges of the sheet are painted, and the creases stay paper.
The edge is as thick as the paper, so a colour on ordinary card is a hairline. Set **Thickness (mm)** to your stock's real caliper, for example 1.2 mm for a thick painted-edge card, and the edge shows as it will look in the hand.
## Camera views
Each scene comes with camera views, shown as buttons above the preview. To add your own, turn the preview to the angle you want and press **+**. In the **Camera views** card, choose the **start view**, which is what customers see first and what the library thumbnail shows. You can rename or delete the views you added.
## Use a scene in a workflow
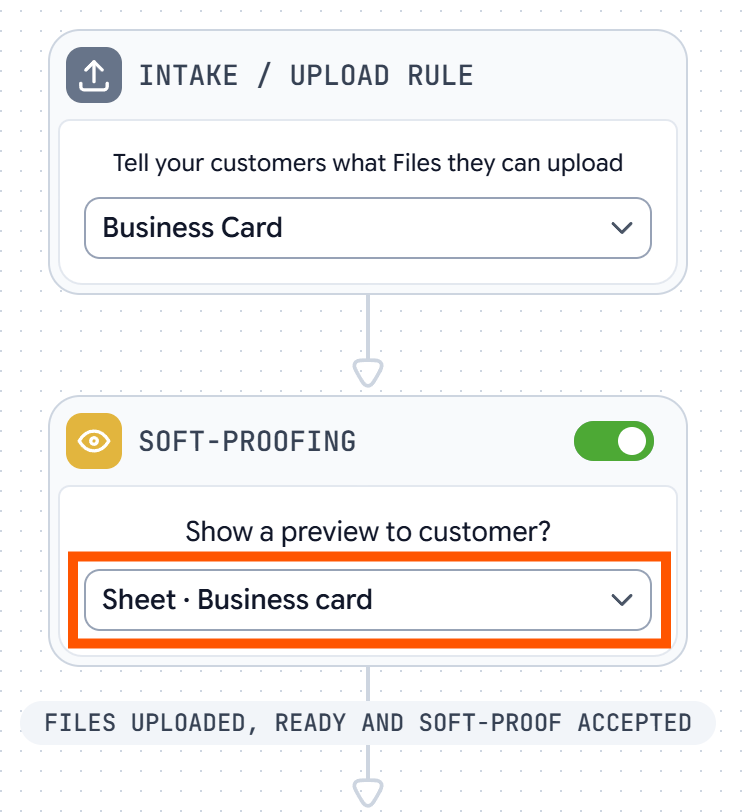
Open the workflow, turn on **Soft-proofing**, and under **Show a preview to customer?** choose the scene. Scenes are listed by kind and name, for example *Sheet · Business card*. **Flat pages** keeps the flat proof, and **+ New scene…** opens the Scene Studio.
A booklet can supply any of its four covers: the **front cover**, the **inside front cover**, the **inside back cover** and the **back cover**. They stay in their places, and the customer's pages fill the pages between them in order. For example, with a supplied front and back cover, a 6-page file becomes an 8-page booklet: your front cover, the customer's pages 1 to 6, then your back cover.
A back cover (or an inside back cover) always lands on the back of the last sheet. When the page count would be odd, a blank page is added before it.
Sides you supply appear in the 3D Proof only. The flat **Pages** view and the print file are the customer's pages as uploaded.
## Paper
Leaflets, booklets and sheets have a **Paper** card:
* **Stock**: Uncoated, Matte, Silk or Gloss. It sets how much the paper shines.
* **Weight (gsm)**.
* **Thickness (mm)**: leave it empty to work it out from the weight, or type the caliper of your stock.
## Painted edges
Flat sheets and folded leaflets can show painted edges, like edge-painted business cards. Set **Edges** to **Painted (a colour)** and pick the colour, or leave it on **Paper**. On a flat sheet the whole edge is painted, rounded corners included. On a leaflet only the outer edges of the sheet are painted, and the creases stay paper.
The edge is as thick as the paper, so a colour on ordinary card is a hairline. Set **Thickness (mm)** to your stock's real caliper, for example 1.2 mm for a thick painted-edge card, and the edge shows as it will look in the hand.
## Camera views
Each scene comes with camera views, shown as buttons above the preview. To add your own, turn the preview to the angle you want and press **+**. In the **Camera views** card, choose the **start view**, which is what customers see first and what the library thumbnail shows. You can rename or delete the views you added.
## Use a scene in a workflow
Open the workflow, turn on **Soft-proofing**, and under **Show a preview to customer?** choose the scene. Scenes are listed by kind and name, for example *Sheet · Business card*. **Flat pages** keeps the flat proof, and **+ New scene…** opens the Scene Studio.
 To show the proof in your product gallery as well, see [Show the proof in the product gallery](/docs/concepts/3d-proofs#show-the-proof-in-the-product-gallery).
This documentation is built and hosted on [Mintlify](https://mintlify.com), a developer documentation platform.
To show the proof in your product gallery as well, see [Show the proof in the product gallery](/docs/concepts/3d-proofs#show-the-proof-in-the-product-gallery).
This documentation is built and hosted on [Mintlify](https://mintlify.com), a developer documentation platform.